big body bead
smalled head bead
lots of tiny beads
30 gauge wire
wire cutters
round nose pliers
ruler
Measure out the wire. I wanted to make it all one big piece, because then I'd only have to hide two wire ends at the end, but the legs can be added in pairs as separate wire. If doing it all on one wire, you have to do some measurements, and some math. First measure a few things- always round up to the nearest half inch, and if its close, add a half inch too.
(body x 2) + (head x 4) + (tiny bead x 6) + (16 x (tiny bead x appox. 20)) + 12"
Before you cut the wire, see how long a line of the small beads looks right to scale with the head body for that last measurement. Since I'm not including sizes for the beads (they can be hard to find, and you may want to make multiple sizes anyway), you'll have to judge for youself.
Once you've measured and cut the wire, at the midpoint, use the round nose pliers to make a loop, and twist around it a few times to secure. This will be the place the spider hangs from. (fig. 1)
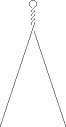 fig. 1 |
 fig. 2 |
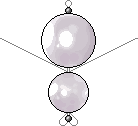 fig. 3 |
With the two wire ends together, thread a tiny bead on both, then the large bead, then the smaller bead, then another tiny bead. (fig. 2) The wires will go through the smaller head bead again, but not the tiny bead, so the tiny bead will secure the beads on the wire. (fig. 3) Pull tight, with the wires sticking out of the middle of the body now.
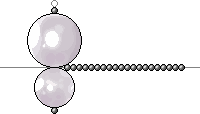 fig. 4 |
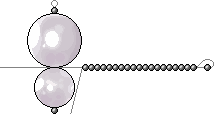 fig. 5 |
 fig. 6 | |
Thread the number of tiny beads for legs on a single wire. (fig. 4) Thread the wire back through all but the last bead in the chain, to secure them. (fig. 5) Wrap the wire once around the midsection body to secure. (fig. 6) Repeat until you have eight legs, four from each wire end. (fig. 7) If you don't have enough wire for all the legs, cut a new piece of wire that's more than four times the leg length (make sure to add a bit for ease of use and wrapping ends, I advise a bare minimum of six inches), wrap it around the body midsection in the middle of the wire once, and thread it as normal.
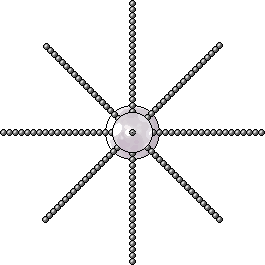 fig. 7 |
 or or  fig. 8 |
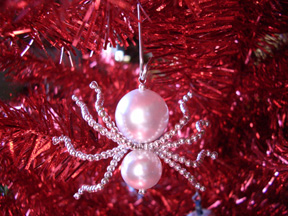
Wrap the ends of the wire around the body midsection again a couple of times to secure, and snip off the ends with wire cutters. Shape the legs (fig. 8), and you have a spider. Hang him on your tree from his little butt.

|